With BLF on your VoIP phone, you can see if a user or colleague is busy or available: a light will blink green, orange or red. Especially convenient for companies with several offices or locations. This article shows you how to set up BLF for different brands of phones. Read more about BLF in general in this knowledgebase-article.
It is possible to edit functional keys via webinterface of the phone. To do so point your browser to the phone IP address.
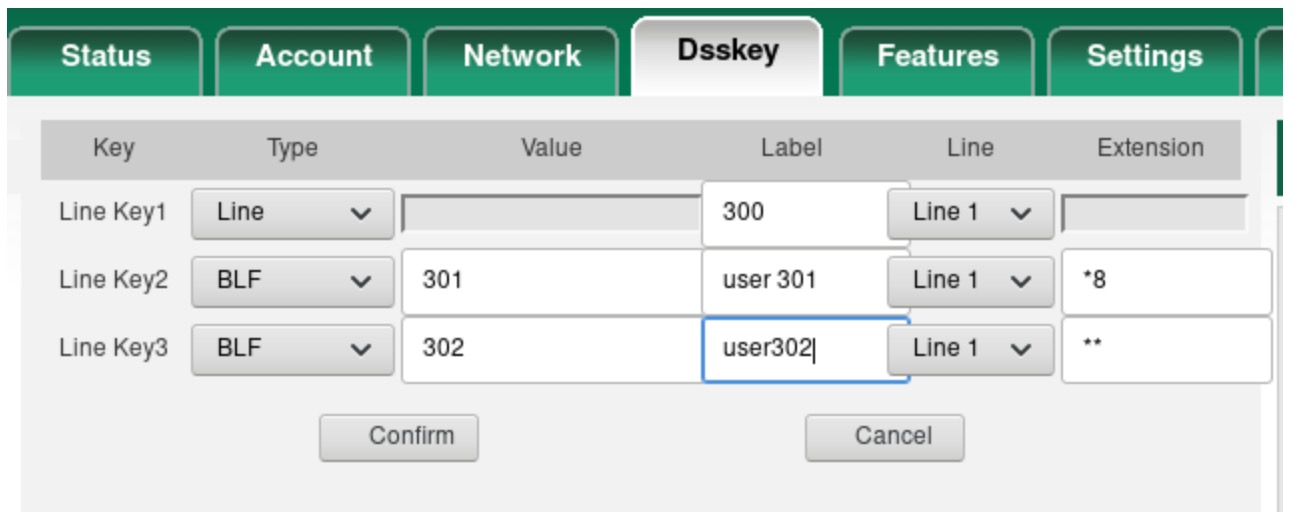
Yealink
-
set field ‘Type’ as “BLF”
-
Set field ‘Value’ as extension you want to monitor (e.g. 300)
-
Set last field ‘Extension’ as
∗∗to match PBX pickup code
Note that field ‘extension’ in the Yealink web interface can be confusing as in their template files it’s called “pickup_value”.
Use *8 if your phone is in the same pickup group as the monitored user’s phone (Communication/Phones -> Pickup Group). In other scenarios use **.
For customers with custom templates:
linekey.1.type = 16
linekey.1.value = 300
linekey.1.line = 1
linekey.1.label = user 300
linekey.1.pickup_value = *8 or **300
(change ‘1’ to line for which you want to use BLF)
Don’t forget to save the configuration, then you can check if LED works like it should:
Led mode for Yealink T2x:
-
Solid green – idle state
-
Fast flashing green – monitored extension receives an incoming call
-
Slow flashing green – busy state, ringing or on hold
-
Off – monitored extension does not exist
Led mode for Yealink T4x:
-
Solid green – idle state
-
Fast flashing red – monitoring extension receives an incoming call
-
Solid red – monitored user is dialing or talking
-
Off – monitored extension does not exist
Please note that the colors used are dependant on your settings in Features → General information → BLF LED Mode setting. Default setting is “0”.
Call pickup
On properly provisioned Yealink phones this step can be skipped.
On Yealink phone:
-
Go to tab ‘Account’ → ‘Advanced’ menu
-
Dialog Info Call Pickup – disabled
-
Directed Call Pickup Code –
∗∗ -
Group Call Pickup Code –
∗8
-
-
Go to Tab ‘Features’ → ‘Call pickup’ menu
-
Direct Call Pickup – enabled
-
Direct Call Pickup Code –
∗∗ -
Group Call Pickup – enabled
-
Group Call Pickup Code –
∗8
-
Snom
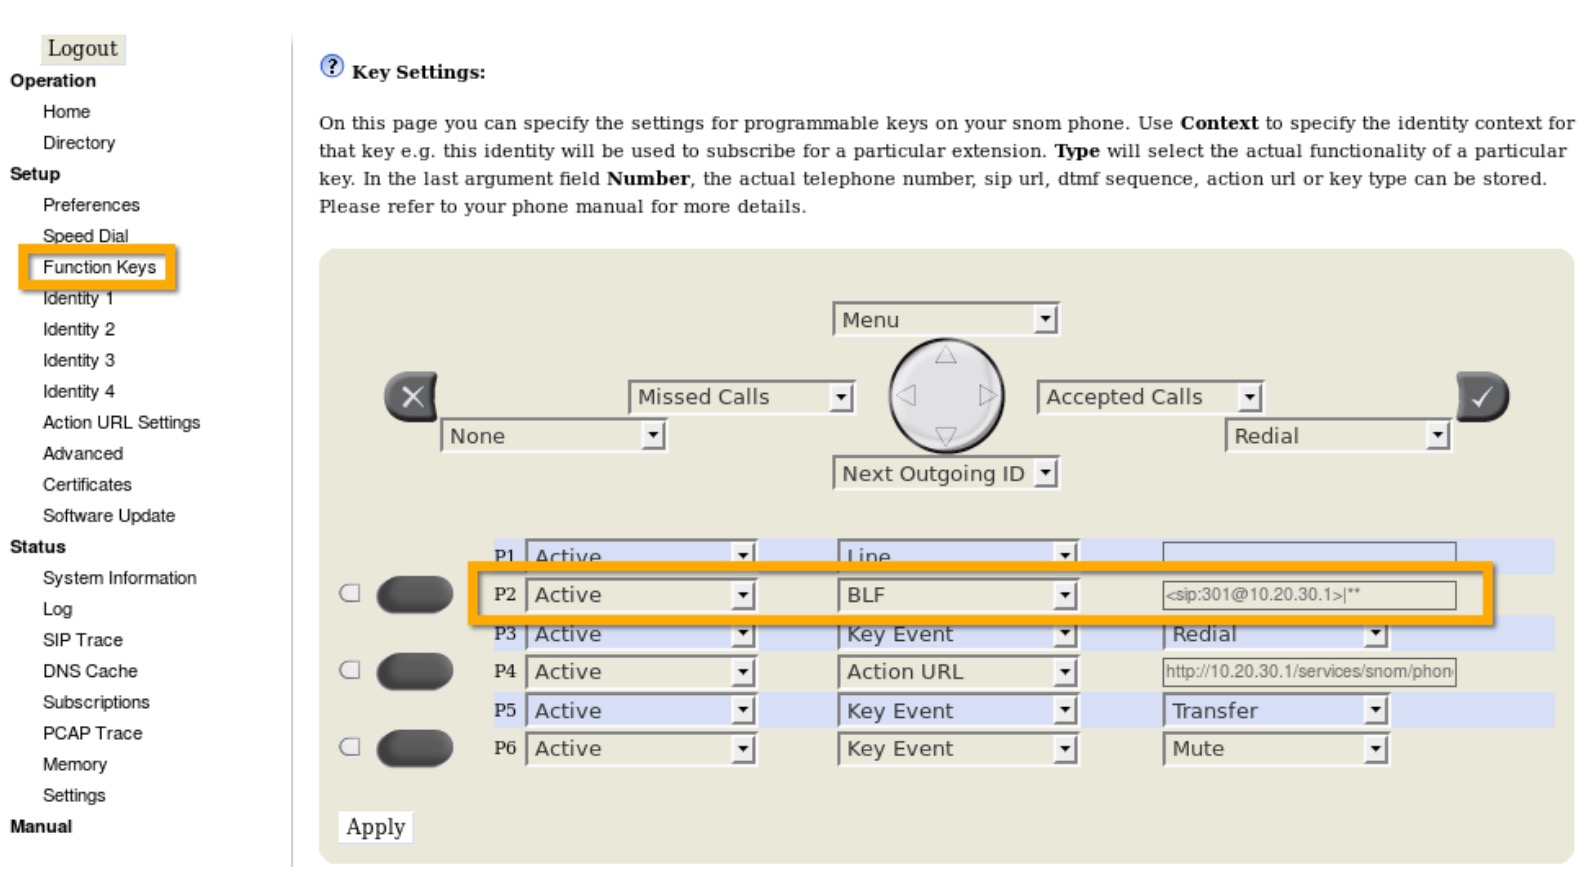
Configure BLF on the buttons P1-Px.
-
Leave first field as “Active”
-
In second field select “BLF”
-
In third field to
<sip:extension@PBXip>|∗∗where:-
extension is the monitored extension (e.g. 301)
-
PBXip is the IP address of your PBX (e.g. 10.20.30.1)
-
-
click ‘Apply’
Don’t forget to save the configuration, then you can check if LED works like it should:
-
Idle state – LED is off
-
Ringing state – LED is blinking
-
Busy or Connected state – LED is on
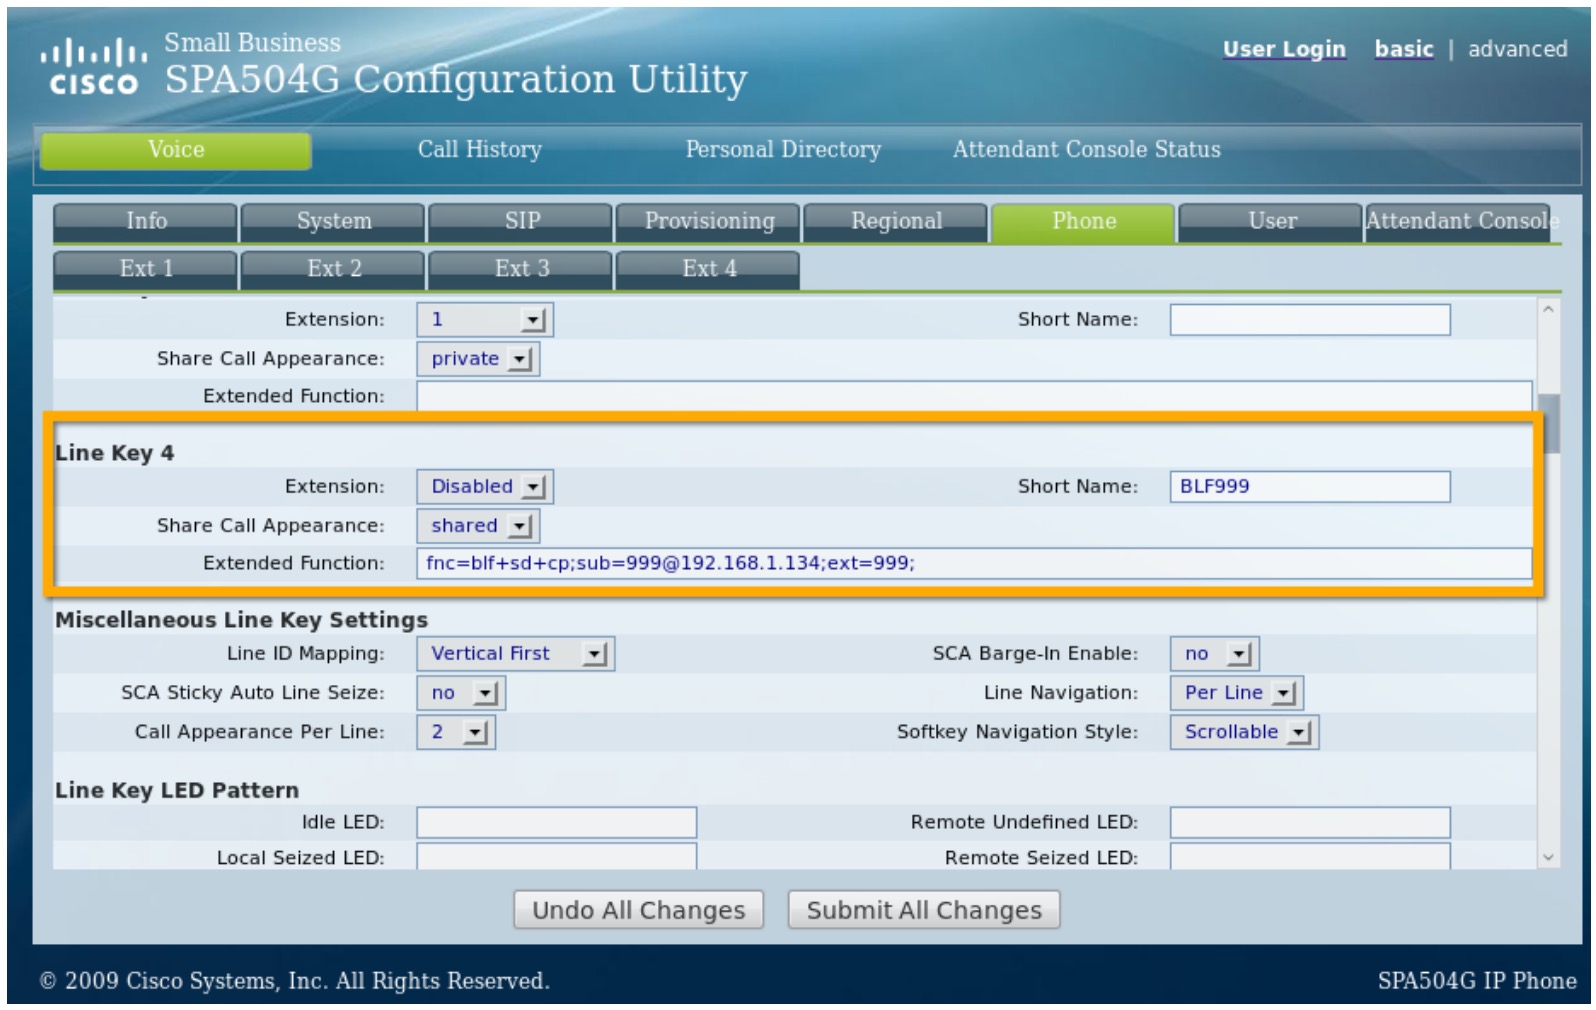
Cisco SPA
In this example Linksys SPA 504G is used.
Log into the phone GUI via browser.

Switch to advanced admin mode:
-
click on ‘admin’ in the right top corner
-
click on ‘advanced’ in the right top corner
-
Click on the “phone” tab
-
Select line you want to set as an BLF and:
-
switch Extension to ‘Disabled’
-
switch Share call apperance to ‘shared’
-
Fill Short Name field this is what will be shown next to the line button on the screen
-
Fill Extended function field with
fnc=blf+sd+cp;sub=EXT#@PROXY;ext=EXT#;
Note: ReplaceEXT#with the Extension number of the phone you would like to monitor, PROXY with the IP address of the PBX.
-
fnc=function. blf=busy lamp field. sd=speed dial. cp=call pickup.
Now you can check if LED works like it should:
-
green – Available/Idle state
-
orange – Error state, phone failed to subscribe
-
red blinking – Ringing
-
red – Busy
Attendant Console configuration
On properly provisioned SPA phone this step can be skipped.
-
Be sure you are still in advanced admin mode
-
Click on “Attendant Console”
-
Switch ‘Server type’ to ‘Asterisk’
-
Attendant Console Call Pickup Code to
∗∗#to match the Asterisk call pickup code.
Auto provisioning
If you are using your custom config files to auto-provision SPA phones then you may add this to your config files:
**#
Asterisk
Disabled
shared
YOURSHORTNAME
<Extended_Function_4_group="Phone/Line_Key_4">fnc=blf+sd+cp;sub=EXT#@PROXY;
-
change
YOURSHORTNAMEto your own short name this is what will be shown next to the line button on the screen -
change
EXT#with the Extension number of the phone you would like to monitor -
change
PROXYwith the IP address of the PBX.